Sunday, April 21, 2013

Spring Tag

I've been working on a Spring tag to share with you.
Because of my love for pastels, I mostly stayed in that color palette. Although I had used Ranger's Adirondack Acrylic Paint Dabbers, it was my first opportunity to work with the Tim Holtz Distress Paints.
I did find that working the paints I wanted to spritz water on my craft sheet before I applied the color to the tag. The Mustard Seed Distress Paint was a little bright for my project so I diluted it with water and applied to the tag again. Next I blotted some additional Ranger Adirondack Cloudy Blue and added a little Dusty Concord Distress Ink to the tag in the spots I knew my stamped background would need.


The background stamp I used is by Inkadinkado and needed the soft colors I was working with. 

I used Ranger Archival Coffee ink to stamp with.


To ensure the details of 
the stamp were visible, I stamped on tissue paper and glued the tissue paper to my tag with Claudine Hellmuth Studio Multi-medium Matte. I used the glue on the bottom of the tissue paper and again on the top of the tissue paper. 

After the tag was dry, I used a tissue to dab on a little more of the Dusty Concord.
The Tim Holtz idea-ology Chitchat Verbiages were inked very lightly with Vintage Photo Distress Stain. 


The butterfly was from a Hero Arts background stamp. I stamped and embossed it, colored with markers and stain, added a gem, cut it out and used foam pads to pop it up on the tag. 


Working with the Distress Paint was so much fun. My flowers were Prima Purple and Prima Lime but with several layers of paint, their bold colors  were soon the pastel shades I was imagining.


It was amazing what a few layers of paint could do to the bright colors of purple and lime. 

I distressed the edges of the tag with the Paper Distresser and painted the edges with Antiqued Bronze Distress Paint. 
This was such a fun project to create and share with you. I can't wait to use the paints again. 

Challenges:
Simon Says Stamp and Show: Backgrounds
Fashionable Stamping Challenge: Sentimental


Sunday, March 10, 2013

Numbers Valentine Card


The Sizzix Tim Holtz Texture Fades Embossing Bingo Folder was my inspiration for this challenge.

Challenges:
Simon Says Stamp and Show: By the Numbers

Sunday, March 3, 2013

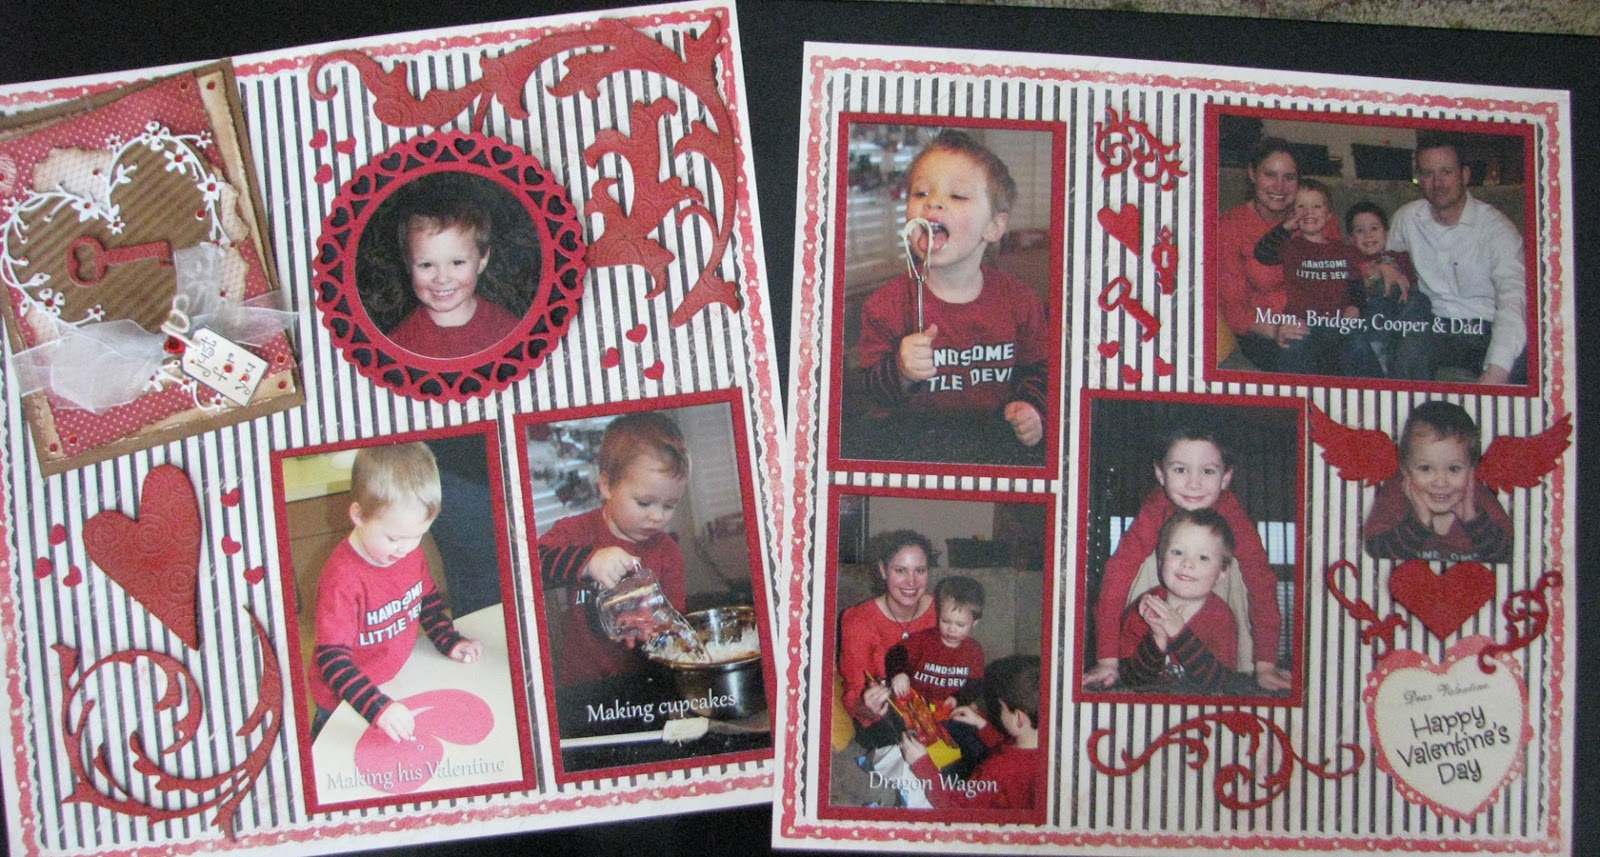
With Love Scrapbooking Layout

The Simon Says Challenge is "the stamp you love (but don't use)...

My entry for the challenge includes two stamps that I never seem to use but worked perfect for my scrapbook layout. Here's the layout then I'll show you closeups of the stamps.


I made the corner embellishment first and yes, I know it looks like a card, but it doesn't open and is simply an embellishment. The tiny stamp "Just for You" is tied to the bow. It is about the size of an A2 card if you wanted to make a similar card. There are lots of layers in this element.


The second stamp was one I found in my container of stamps, it's a Hero Art stamp and perfect for the layout.

You know how you dig through your stash and just seem to find the perfect elements. Guess it pays to dig! I found all the Tim Holtz Grungeboard pieces used on the layout in a sack in my stash. They were then stained with Distress Stains and adhered to the pages. 

Other elements:
·        Spellbinders Nestabilities Decorative Elements Heart Circle and Standard Circle
·        Memory Box Bingham Heart and Grand Heart

Paper is *Authentique 12 x 12 LOVELY Paper & Stickers LOV010

Challenges:
Simon Says Challenge: the stamp you love (but don't use) . . 
Layer it On and Share A Word at Frilly and Funkie
Anything Goes at Simon Says Stamp Challenge

Friday, February 1, 2013

Seeing Stars Scrapbooking Layout

The inspiration for my Seeing Stars theme came from the stars I was using on my grandson's scrapbook layouts for his soccer and T ball pages. 

I used the Sizzix Stars #2 die to cut the large, medium and small stars for the layouts.

The star border was cut using a svg file with the Sure Cuts A Lot program. 

Lots of fun memories were created when this "little star" played soccer and T-ball over the summer.

Challenge:
Simon Says Stamp and Show: Seeing Stars


Saturday, November 10, 2012

Les Miserables Papercrafting Project


When I think of France, the famous French novel “Les Misérables” by author Victor Hugo instantly comes to mind. I saw the musical at the Music Hall in Kansas City and truly loved it and of course shed tears throughout, but I am a softy.  Here's my stage and sign for the musical.


The novel is considered to be one of the greatest novels of the nineteenth century and follows the lives and interactions of many characters. The character in the novel and musical I am focusing on is Cosette, whose story is quite moving.


I printed a portrait of "Cosette" by Emile Bayard, from the original edition of Les Misérables (1862) on an ink jet printer. Cosette is a fictional character in the novel whose mother, Fantine,  places her under the guardianship of the Thénardiers, where she is severely mistreated.

You may want to read the novel or see the musical to follow the life of Cosette.

http://en.wikipedia.org/wiki/File:Ebcosette.jpg

I added some stains to the image for contrast, on the wooden door I used Vintage Photo, on the stones - Pumice Stone; on Colette - a little Barn Door on her hair; and on the water - a little Glossy Accent was added for shine on the water highlights.


I wanted to make a stage and a Honey Maid Graham Cracker box was the beginning of my stage.

I cut the front panel of the box to open it up like a stage and began staining it with Black Soot. It took several coats of the Black Soot.


For stage curtains, I started with white lace ribbons stained then thought I wanted red curtains so stained the lace with Barn Door Distress Stain. 


My first assembly came together pretty well but I wanted a Broadway type sign on top so wanted to add some lighting on the sign. 


I made a a sign for the top of the stage to resemble a Broardway sign and used dew drops for the lighting effect.


Now it was time to create a small sign to sit in front of the stage promoting Les Miserables. I used a Sizzix Nestabilities die to cut the small sign and stamped with a Hero Arts stamp repeatedly, added a fleur de lis, a ticket, some script, Tattered Banner. distress ink and a picture of Cosette from the musical.


There you have it, my stage and signs are complete - Judy.

Challenge:
Simon Says Stamp and Show: Inspiration Francaise

Saturday, November 3, 2012

Remembering Family Scrapbook Layout

Today's post is all about family, pearls, flowers, and pastels. So expect to see a lot of each. This page will become part of an album honoring my parents and grandparents. The paper is by K&Company and seems so perfect for a bit of nostalgia. 


 I toned down the white streaming ribbons with a few swipes of Old Paper Distress Ink then tied the ribbon in a bow and trimmed the streamers to fit the space.
The flowers were white and I wanted to make them a shade of pastel pink by first inking them with a tiny bit with Old Paper for a little shading then inking again with Angel Pink Memento Ink.

I also sprayed the flowers with Perfect Pearls - Pearl for some added shine and glimmer.

As I was inking the flowers I remembered some pink ribbon roses  that I used over twenty years ago and thought they were in my sewing chest. I had stitched the three roses together and added the green ribbon stems for a project years ago. 


There was only one issue, the roses were a much brighter shade of pink, too bright for this pastel project. 

To solve the issue, I first dabbed on Picket Fence Distress Stain. Wow, it worked and my roses were a much softer pink! I followed by adding a little Pearl Paint using an Adirondack Paint Dabber and was pleased with my results.


While digging in my sewing chest, I saw some straight pins that had white heads and knew I wanted to add a few to the roses and stems.

Three pins were added to keep it an odd number.
The pearls for the flower centers is White Opal Liquid Pearls by Ranger. I could have used stick on pearls but I enjoy squeezing the bottle and making my own.

I used the same technique for the pearls on the ribbons. Now my project needed to dry for a while since the Liquid Pearls can be smudged very quickly with the slightest touch of a finger.

The K& Company paper had a small vine running around the border which gave me an idea to add pearls along the vine. Here I decided to used stick on pearls so I would not have to worry about smudging the pearls as I was working.

There you have it, this page is complete and ready for the album. Thanks for stopping by - Judy.

Challenges:
Simon Says Stamp and Show Challenge: Just Add Pearl
Fussy and Fancy Friday Challenge: Pearls and Flowers

Friday, November 2, 2012

Christmas Pearls Card

Working with pearls, how elegant is that? The Simon Says Stamp Challenge: Just Add Pearl gave me the chance to work with Perfect Pearls Mist, TH - The Snowflake Rosette, a Nestabilities Label and lots of stick on pearls. This week's challenge at Joan's Garden is "A Winter Card" so great, I can enter both challenges with this card. 


I want to make use of the cutout piece from the Spellbinders Nestabilities Label so I made a second card. I wish you could see the Shimmer on the white paper and the blue paper. They add so much sparkle to the paper.


Supplies:
Tim Holtz Alterations: Tattered Banners and Snowflake Rosette
Ranger - Perfect Pearls Mists: Perfect Pearl and Heirloom Gold

Paper:
White Shimmer by TPC Studio
Ice Blue Metallic by The Paper Company

Spellbinders Nestabilities - Labels 18

Crystal Stickers - Pearls Perles

Silver Elastic Cord